Care and Maintenance of Your Slimline Water Purifier
Congratulations on owning one of the finest water purifiers made.
The Slimline counter top purifier is very easy to look after.
When the water flow slows down to a trickle it means the ceramic needs to be washed. This sometimes does not happen before the cartridge needs replacing but we want to explain how it is done.
Below are simple to follow instructions on how to do that. Or click HERE
Also, you need to replace the cartridge once a year. This will protect your 50 year warranty on your unit.
It would be also beneficial to register your warranty HERE
We will be in touch with you regarding this replacement. If you do not hear from us in 12 months, then please call us toll free at 1-877-523-7800 or email us at service@americanwaterlesscookware.com
It is also important to lubricate the diverter valve ever 6 to 12 months.
This is the thing attached to the faucet with the pull out knob to get the water.
Take some pliers and remove this. Then add a few drops of cooking oil into the hole inside it. Then pull the knob in and out a few time until it seems smooth and pops back easily. Then rinse with hot water and screw back onto the faucet.
CLEANING AND MAINTENANCE (Counter Top)
Note: Prior to service, ensure you have some petroleum jelly (Vaseline) on hand
along with a brush or rough nylon pad for cleaning the ceramic.
- To service the counter top system, clean the ceramic or replace cartridge, place the unit into the sink.
- Unscrew the sump containing the cartridge with the provided wrench and let the water run off.
- Lift off the housing lid with the cartridge still installed on the base and drain off the remainder of the water. Carefully remove the ceramic unscrewing anticlockwise and clean following the instructions.
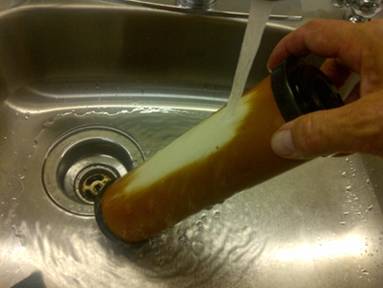
- Using a stiff brush, or nylon scouring pad such as a green ScotchBrite scrub pad, scrub the outer surface of the ceramic under cool running water until it returns to a uniform off white color
(yellow tint). Do not scrub too close to the mount. This is the area most prone to accidental breakage during installation or removal so it is best to keep the ceramic as thick as possible next to the mount.
CAUTION: Always keep the inlet up (threaded mount) and do not allow the inlet to come into contact with the running water. Note: Never use soaps, detergents, bleach, or any other chemical during the cleaning process. Excessive cleaning shortens the life of the ceramic. - If you have a bottle brush you can clean inside the cover with hot soapy water, then rinse well. Lubricate the “o” ring and threading of the base with Vaseline and replace the cartridge and lid. Hand tighten only.
- Let the water flush for one minute. (If replacing with a new cartridge let it flush to waist for five minutes.)
- While the water is running, turn the unit upside down for 10 seconds to flush out the air pocket.
DIVERTER VALVE SERVICE
- The diverter valve must be serviced regularly. The exact service interval is impossible to dictate, as it is the condition of the incoming water that requires the valve to be serviced. Mineral deposits and contaminants in the water will build up on the internal “O” ring seals and cause the valve to stick or become stiff to operate. Failure to service the valve will eventually cause the “O” rings in the valve to fail. Note: A good rule to follow is to service the valve each time you clean the ceramic.
- Unscrew the diverter valve from the faucet. Place a single drop of liquid dish washing soap into the top of the valve and steadily operate the diverter valve back and forth. Continue to do this under a fresh stream of water to flush away the soap.
- Place several drops of liquid cooking oil (canola not olive oil) into the top of the valve and again operate the diverter valve stem back and forth. Rinse with hot water.
- Connect the diverter valve and test for leaks.
Click Here to see a short video clip on how to wash the ceramic and make it clean again.